Tuesday, June 25, 2019

Stacked in the Summer Sun!!

Summer is finally here in Northeastern Washington State... in the last few years I have come to doubt it's timely arrival... thankfully, my lack of patience didn't detour it in the slightest!! 

In the spirit of this wonderful season and being inspired by the fragrant and colorful blooms of the surrounding garden beds, I set out to create a work of clay art with hopes of complimenting natures own beautiful works!! 

Voila, our latest "Show & Tell" is my finished project... "Dot's Garden Totem" constructed of 15 individual components stacked on rebar & a concrete pier for stability. All separate pieces are handmade of porcelain w/ celedon glazes in complimentary colors. Embellishment on the bird is made of copper wire and glass beads. 

"Dot's Garden Totem" approximately 44 inches tall


Pictured Below: Close-up views of individual component shapes & texture designs


Thanks for stopping by...  
Until next time, Happy ARTing!!

Sunday, April 7, 2019

Position available for one loyal & reliable Muse... apply within!

After a very long and uninspired Winter, I am thrilled to see that Spring has finally come to my little corner of the world... just in the nick of time, I was beginning to fear for my artistic sanity and general well being!

I realize it will probably take awhile to get my creative mojo back, soooo I am prepared to take baby steps along the way... Today's Show & Tell is just a little exercise in color and form, topped off with a touch of whimsy!

Below: "Chuckle Chimes" are constructed of handmade porcelain components, embellished with crystal beads and colored aluminum wires. Approximately 12 to 14 inches in length. (I keep hoping that someday I will learn to take better photos of my work but for now, they are what they are!)


Thanks for stopping by, it feels good to be back...
I'll do my best to show up more often!
Until next time, Happy ARTing & Blessings to all!!

Thursday, December 20, 2018

Texturize your way to fun!

I just couldn't believe that I would let this holiday season go completely unrepresented on my blog, so here goes with a little Show and Tell to fill the bill!

I recently started experimenting with adding a bit of texture to my porcelain designs. I have in the past, carved into the clay with tools to make a variety of patterns but without getting my desired results. Having made my own carved rubber stamps for printmaking & mixed media projects, I decided to make some textured stamps out of polymer clay to use on my clay works.

Below are my clay stamps... each has a different design on each of it's ends.


I chose to test my new technique on two different surfaces. I made ornaments in the shape of a cross for a flat surface and small slab bowls for a curved surface.  

Below are photos of some textured bisque ware cross ornaments & slab bowls.


Below are photos of some of the glazed finished pieces... I chose translucent Celadon Glaze for it's ability to enhance the texture, especially on porcelain!


 Textured Porcelain Ornaments
(sizes vary, 3 - 6 inches)


Textured Small Slab Bowls 
(approx. 1 1/2" deep X 3 1/2" diameter)

Thanks for stopping by...

I hope that you have been inspired to try something new, no matter 
what your favorite medium may be, it's always fun to experiment!

Until next time... Blessings to One & All!

Friday, October 26, 2018

Let the Sun shine in, face it with a grin...

It took me a bit longer than expected but a new computer has finally gotten me up and running again (or in this case, blogging) To help break it in, here's a little Show & Tell for today! 

A few months ago I posted a windchime project that I was working on, I have continued in that mode by creating a smaller version with one of my Hedouni character sculptures as it's centerpiece. By combining handmade glazed porcelain components with an assortment of colorful crystal beads in varied sizes, they become a unique & whimsical hanging for any sundrenched window!


Below are a few pics of my hangings... the pics definitely don't do them justice, I just couldn't capture the wonderful way the crystals twinkle in the sunlight!


 Hedouni Sun-chimes approximately 12 -14 inches in length

Original Designs, handmade Celadon glazed porcelain components

Close-up of Lola - Multi Color Glaze 

Thanks for stopping by, until next time...
Happy ARTing to One & All!

Sunday, August 19, 2018

Don't take any Wooden Nickels... try ATC Coins!

It seems like a new ATC (Artist Trading Card) sensation has emerged while my back was turned... as their name implies, ATC Coins have retreated from the usual rectangular format and moved into the round! Just like the originals, the size of the coins remain approximately 2 1/2 inches and will still fit into an ATC sleeve when finished. An individual artist's choice of mediums and styles are the differences that set them apart for collecting... let the trading begin!!

I decided it was time to jump in and get my feet wet... I joined an open themed ATC Coin swap at ATC's for All... artist choice is my favorite, how could I pass it up? 

I managed to come up with a few possible ideas... so, in the spirit of this swap, I decided to just flip a coin... Heads & Tails both won?!! 

Below... here's what I came up with!

Heads...  (I win!)

or Tails... (you lose!)

As always, thanks for stopping by...
Until Next Time, HAPPY ARTing!!

Saturday, July 7, 2018

Look what the wind blew in!

I won't even try to explain my lengthy absence... life just seems to have a plan of it's own and I am learning (apparently, it truly is never too late) to just accept it and go with the flow! 

Today I have a little Show & Tell that sums up where I have been Artistically... for literally months, I have been making ceramic pieces that will eventually be used to create Wind Chimes... I'm not exaggerating when I say that I have several hundred pieces (big & small) waiting in the wings to become a chosen component in my next creation. 

Below are some pics of a small portion of my unglazed stash...


Here are some examples of glazed pieces... I've chosen a variety of Celadon Glazes, I love the translucent colors over the porcelain... the texture really stands out! (some heavier glazes fill in areas & the details get lost) 


I really love to insert glass beads in the mix, just gotta have a little bling to shine in the sun... (another small portion) like any good bead artist, I have many more containers to choose from!! 


Voila... production has finally started! 

Below is a pic of Chime #1 fresh off the assembly line or in this case, table!!


Small Wind Chime
Size: Approx. 6" across & hangs down 16"


The chime sound on this one is created from the glass rings hanging in the center... I made them by cutting rings from a wine bottle using a bottle cutter and then slumping them in my kiln. I love the sound that the glass creates, it doesn't take very much wind to make it sing!


 There's more to come... 
Hopefully you'll stop by to check out my progress!!
Until then, Blessings & Happy ARTing!! 


Friday, March 30, 2018

Hidden Treasures... both inside & out!!

Just a quickie Show & Tell for today... I recently had the opportunity to join in the fun & challenge of another swap on AFA... Amulet Bags. These wonderful little purses are designed to wear as a necklace carrying a small treasured item, they can be made from a plethora of materials and in just as many different styles! After considerable thought, I chose to create small suede pouches that required no sewing and can be finished off with embellishments of your choice.


As I mentioned previously, no sewing skills are needed to create these fun and simple little pouches. 

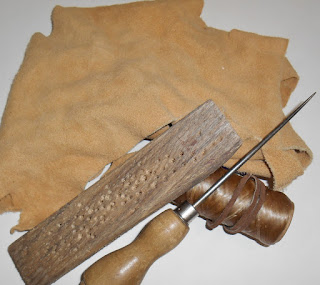
Below: Tools & Materials needed... an awl or ice pick, a block of wood or other soft material to use as a backing for poking into... Suede or leather of your choice and some kind of cording such as rawhide, braided leather or fibers to make the necklace strap ( approximately 1 yard). 


Below: Pattern Template... cut one for each pouch out of the suede... use your awl & block to poke holes where shown on the template. To attach the cord, start with the 3rd from left of the 4 holes across the top row of holes... bring the end of your cord through the back using about half of your cord, next... continue around the circle weaving in & out of all the holes until the last hole (next to the one where you started), it should be going out the back along side the cord tail remaining from the start-up. Hold both ends of the cord and gently pull to start the suede pouch to pucker & close up... cord can be pulled & adjusted to even them up to the same length and can then be knotted together to form the necklace. The pointed part of the pattern then forms a flap to cover the opening. Hope I didn't lose you along the way... sometimes the easiest thing sounds complicated when you try to describe it!! Trust me, it is soooo easy, jump in & give it a try!!

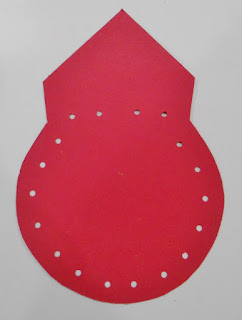
6 1/2" Overall Height - Circle 4 1/2" Diameter

Once you have your completed pouches, you can let your imagination & creativity run loose and embellish them in any number of ways!!  For me, it was a no-brainer... I have an over abundant supply of beads from past projects that I can't ever seem to downsize!! 

My Bead Stash - this is just one layer of my box!!

Unfortunately, these old hands don't cooperate as they once did, but nonetheless, I continued to forge on! I managed to make some simple beaded "cabs" to attach to the flaps as a focal point and a little fringe at the points to finish my designs. 


Voila... my interpretation of Amulet Bags!


Well, I hope you found a bit of inspiration today?!

Thank you for stopping by, Until next time...
Happy Arting!!

Wednesday, February 21, 2018

Where's Spring... only the Ground Hog knows!!?

Winter seems to be taking it's toll on everyone around me this year, I refuse to think my advancing years have anything to do with my sluggish creativity...after all, one's Muse must be forever young of heart & spirit, so I'm expecting to just shake it off and get back to ARTing my days away 'til spring!!  

Lucky for me,  I found some much needed inspiration in the form of a couple art swaps on Atc's for All... I have been having to step back a bit due to an aggravating injury to my right hand that is limiting my ability to accomplish some tasks. My biggest frustration is that my Janoodlin' days are over for awhile, I simply can't hold my trusty magic pen with fingers in splints... on a brighter side and much to my surprise, I have managed to still do many other things at a much slower pace & fumbling along with my left hand... where there's a will, there's a way!!

Just a quicky Show & Tell for today...  Fabulous Flowers Swap! The challenge is to create paper flowers that can be mailed out flat, the recipient can then add stems & fluff up to display as a bouquet in a vase... a touch of color to keep us going until Spring!! 

I chose to create mine with brightly colored tissue paper in a variety of color schemes... the technique of collaging tissue with mixed media paper sandwiched in the center of the layers makes the petals strong yet flexible... the petals can easily be curled to give a 3-dimensional effect when displayed.

Pictured below are templates that I made for the basic shapes and my stash of tissue paper... add a little glue & the magic happens!! 

Templates - cut out your mixed media
paper to cover with tissue paper

My Stash - use colors of your choice!  

Old Family Recipe!
Equal parts glue/medium or ? - experiment!
(Water as needed to thin)


Voila... my finished posies! 


Thanks for stopping by, until next time...
Blessings & Happy ARTing!!


Monday, January 22, 2018

2018... The Year of ART!

Better late than never, Happy 2018 to One & All... The New Year is traditionally marked for new beginnings... putting away the past and reaching toward those hope filled days that lie ahead! I'm really not one to make New Year's Resolutions and this year is no exception... there's something about that word resolution that conjures up a feeling of too much pressure to succeed... I learned years ago that it's far too disappointing after making a heartfelt "declaration of intent" to only discover yourself falling short of your goal far quicker than you could have ever imagined! Age has taught me one very freeing lesson... at this stage, I definitely prefer flexibility in my day to day life... no big resolutions for this old gal... things may or may not happen as planned but I will adapt & keep on going without using that ugly word... failure!! 

Let's get down to business & focus on my favorite word... ART! 

Today's Show & Tell is a little project that I worked on for an AFA Swap titled Calm after the Holidays... we were each assigned a fellow artist and became their Secret New Year Santa! After finding out who would be receiving my gifts, I set out to create items that I hoped would not only please her but showcase my style of ART as well! 

(Since my partner has received her package, my post will not ruin the surprise!)

Below are photos of what I came up with...

 Top: Mini Janoodle Canvas w/Easel - R: Beaded Amulet Bag
L: Lester the Jester porcelain sculpture & beads w/wire & glass beads 

Below... Lester's closeup before embellishment and hanging after 


Thank you for stopping by, until next time...
Blessings for an ART filled New Year!!

Tuesday, December 26, 2017

Time keeps on tickin' tickin' tickin'...


Just a little post holiday Show & Tell to share today... I'm sure that I have one thing in common with all of you fellow artists out there, we love to create one of a kind Christmas gifts for our family & friends! Through the years they have come to be expected by everyone I know, but I wasn't so sure that my creations were really something they looked forward to (kind of like that dreaded fruitcake that keeps getting passed around)... so, a few years ago I decided to whittle down my gift list to a few diehard fans of my ART!

This year, one of my friends created a new craft room in her home... it is the first time she has ever had a designated place all of her own to create in, HGTV would use a popular phrase like an "ART-cave", but I'm an old fashion kind of gal, I still call it a studio! She mentioned one day that she loses track of time when she's in there working on a project and thought that she needed a clock to help bring her back into the real world! That's all that I needed to hear... the perfect gift and a new "untried" challenge for me... I will make her a clock for Christmas!!

After thinking about it, I decided on a simple "combo" design using porcelain components added to an acrylic base where the clockworks would be attached.  

So, a trip to the local glass shop to acquire a piece of acrylic... surfed the net, clockworks ordered... it's time to pound some clay!!

 This is where the "Magic" happens - (too tidy? yes, a "before" pic)

Below pic... the naked porcelain components before being decorated.

Bisque-fired and fresh from the kiln

Below pic: My friend loves any & all shades of the color purple as well as polka dots... so, to me there was only one way to go... along with a few bright accent colors to pull it all together... a clock was born!!

Voila.. finished clock hanging in it's new home!

Thanks for taking the TIME to stop by!
 Until next time... Happy ARTING!!
 

Monday, December 25, 2017

Seasons Greetings!!

Merry Christmas from my "Neck of the Woods" 
I'm not dreaming... we're having a White Christmas!!! 
( brrrrr, it is now - 4 degrees)

A little glimpse at the backyard where the pond should be!


J
ust for fun, I have a little Holiday Show & Tell...


I recently went to the Big City in search of a little Christmas Spirit, we chose to take in the Holiday Light display at the Conservatory in one of the parks... they have thousands of species of tropical plants that were decorated in colorful lights... it was a wonderfully festive sight, even the cacti were strung with lights, all I could think of was... OUCH!!!  


The photos below are just a very small sampling of the remarkable display, I know that they do not do it justice but I had to share anyway!!!


Blessings to you & yours 
for a joyous and healthy NEW YEAR!!!

Monday, November 20, 2017

Once a Claywoman, Always a Claywoman!

In my neck of the woods, Autumn and Thanksgiving traditionally mark the beginning of our annual local Holiday Arts & Crafts Fair Season! Although I have participated as an exhibitor on more occasions than I can recall, the past few years I have merely been relegated to the sidelines as a spectator. In an attempt to encourage a creative friend who had little confidence that anyone would ever want to buy her wares, I set out to entice her with an offer to step out of retirement to share a space. We chose a local venue that allowed "booth sharing" and with a few months to prepare, we set out to create our individual inventories! 

I made the decision to produce one of my time tested creations... porcelain Christmas ornaments, small affordable pieces that always seem to catch the eye of passers by, if for no other reason than to stop & smile at what they see! Even after 30 years, these small but unique sculptures seem to speak out loud & ask to be seen!! Several years ago I created an entire sculpture series titled Hedounies... they were larger single & multiple figure sculptures that I sold in galleries and art shows for many years before putting them into retirement!   When it came time to brush off my clay table and get to work, I set out to bring life to a new generation of ornaments called Treedounies I was definitely out of practice and felt a bit rusty, but for better or worse, I loved every minute of feeling porcelain on my fingertips once again! 

The first two photos have been retrieved from my archives to give you an idea of what my Hedounies looked like... I didn't have any other digital photos so this is the best I could provide at this time... the 1st one, titled "What's Up?" measured approx. 14" in height and the 2nd one, titled "What's New?" measured approx. 10" tall X 12" long. Both were created from porcelain and airbrushed with underglazes before being sprayed with a crystal clear glaze top coat.
 

Well, enough of my little walk down memory lane!

The following photos are an assortment of some of my latest Treedounies... each ornament is created from porcelain and finished with air brushed underglazes and a matte finish.

Treedounie Bells - the clapper in the open bottom is a jingle bell
 
Treedounie Ornaments - size varies, approx. 2 1/2" to 3"

So... in the end, the show was a success... my friend's work was well received and she sold enough to encourage her creative juices to keep flowing!! The most important thing of the day, we had fun!! 

Once again, thank you for stopping by...
Until next time, Happy ARTing!!